いよいよ「POI」を導入
前回は久しぶりにDocker上にSpring Bootの環境を作りました。
今回は前回作った環境にいよいよ「Apache POI」を導入して、いろいろと触っていきたいと思います。
前回、Spring Initializrを使って環境を作成した時、Gradleプロジェクトを選択しました。
それはつまり、パッケージ管理にGradleを使うということです。
なので、新たにライブラリを追加しようと思ったら、プロジェクト配下の「build.gradle」ファイルを「依存関係に追加されるように」編集するだけです。
plugins {
	id 'java'
	id 'org.springframework.boot' version '3.0.6'
	id 'io.spring.dependency-management' version '1.1.0'
}

group = 'biz.systemcraft'
version = '0.0.1-SNAPSHOT'
sourceCompatibility = '17'

configurations {
	compileOnly {
		extendsFrom annotationProcessor
	}
}

repositories {
	mavenCentral()
}

dependencies {
	implementation 'org.apache.poi:poi:5.1.0'       // 追加
	implementation 'org.apache.poi:poi-ooxml:5.1.0' // 追加
	implementation 'org.springframework.boot:spring-boot-starter-thymeleaf'
	implementation 'org.springframework.boot:spring-boot-starter-web'
	compileOnly 'org.projectlombok:lombok'
	developmentOnly 'org.springframework.boot:spring-boot-devtools'
	annotationProcessor 'org.projectlombok:lombok'
	testImplementation 'org.springframework.boot:spring-boot-starter-test'
}

tasks.named('test') {
	useJUnitPlatform()
}
dependenciesに「poi」と「poi-ooxml」という2つの依存関係を追加しています。
これで「Apache POI」が使えるようになったはずです。
まずはシンプルなエクセルを作ってダウンロード
簡単なところから始めよう、ということで、あまり難しいことはせず、まずはシンプルなエクセルを作ってダウンロードする機能を作ってみます。
前回作った「index.html」ファイルを下記のように修正すると、「ダウンロード」ボタンが画面に追加されます。
<!DOCTYPE html>
<html xmlns="http://www.w3.org/1999/xhtml"
      xmlns:th="http://www.thymeleaf.org">
  <head>
    <title>Demoアプリケーション</title>
    <meta charset="utf-8" />
  </head>
  <body>
    <h1>Hello world!</h1>
    <!-- 追加(ここから) -->
    <a href="/download-excel"><button>ダウンロード</button></a>
    <!-- 追加(ここまで) -->
  </body>
</html>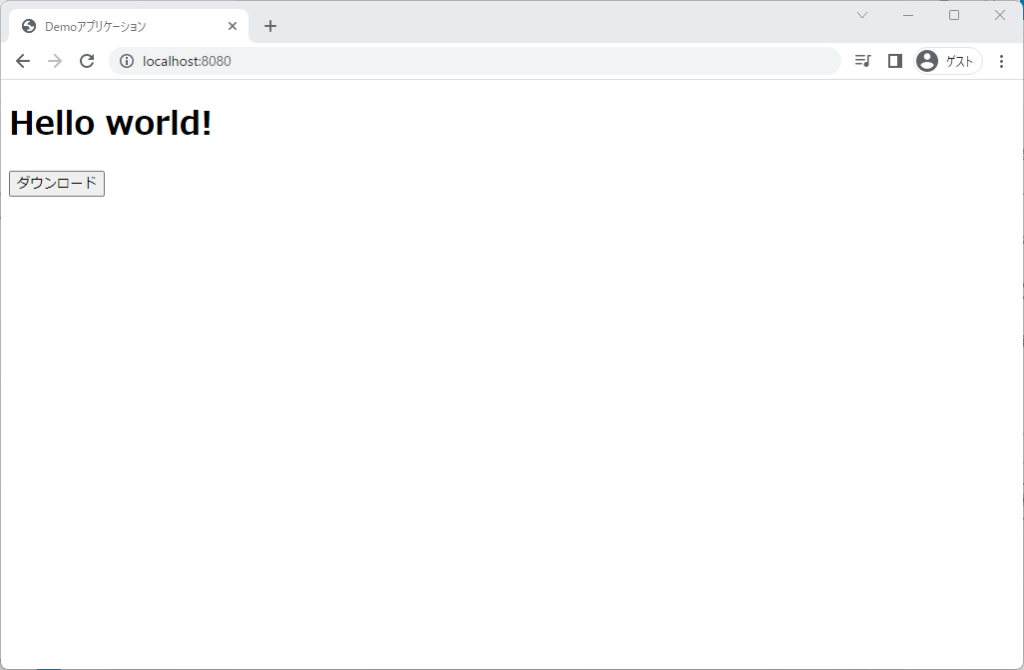
追加された「ダウンロード」ボタンをクリックすると「/download-excel」にGETリクエストが送られます。
続けて、IndexControllerを下記のように修正してエクセルファイルを生成してダウンロードする処理を実装します。
package biz.systemcraft.demo.controllers;

import java.io.IOException;
import java.time.LocalDateTime;
import java.time.format.DateTimeFormatter;

import org.apache.poi.ss.usermodel.*;
import org.apache.poi.xssf.usermodel.*;
import org.springframework.stereotype.Controller;
import org.springframework.web.bind.annotation.RequestMapping;
import org.springframework.web.servlet.ModelAndView;

import jakarta.servlet.ServletOutputStream;
import jakarta.servlet.http.HttpServletResponse;

@Controller
public class IndexController {
    @RequestMapping({ "/", "/index" })
    public ModelAndView get(ModelAndView mav) {
        mav.setViewName("index");
        return mav;
    }

    // ************** 追加(ここから) ***************
    @RequestMapping({ "/download-excel" })
    public void downloadExcel(ModelAndView mav, HttpServletResponse response) throws IOException {
        //HTTPヘッダに、ダウンロードファイル名を設定
        response.addHeader("Content-Disposition", "attachment; filename=\"sample.xlsx\"");
        //Excelファイルの作成と、レスポンスストリームへの書き込み
        try (ServletOutputStream stream = response.getOutputStream()) {
            // xlsx形式ブックの生成
            Workbook wb = new XSSFWorkbook();
            // シートの生成
            Sheet sh = wb.createSheet();
            // 行・セルの生成
            Row row = sh.createRow(0);
            Cell cell = row.createCell(0);
            try {
                // 現在時刻を取得
                String now = LocalDateTime.now()
                    .format(DateTimeFormatter.ofPattern("yyyy-MM-dd HH:mm:ss.SSS"));
                // セルに値を設定
                cell.setCellValue("出力時間:" + now); // 値のセット
                // Excel出力
                wb.write(stream);
            } finally {
                try {
                    wb.close();
                } catch (Exception ex) {
                }
            }
        }
    }
    // ************** 追加(ここまで) ***************
}
31~51行目が「Apache POI」によるエクセルファイルの生成処理部分です。
Bookを生成し、Sheetを生成し、行・セルを生成し、セルに値をセットしているだけのごくシンプルなロジックになっています。
※ちなみにこのロジックはこちらの記事をそのまま利用させてもらいました。
実行すると、下記のようなエクセルファイルがダウンロードされます。
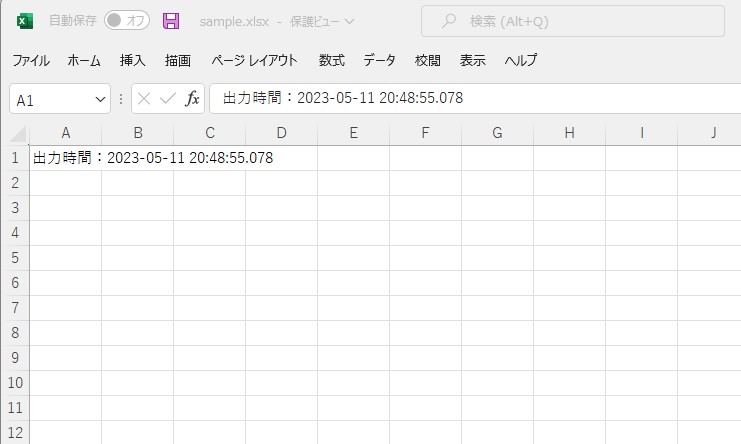
これだけ見ると直感的でわかりやすく扱いやすいライブラリに思えます。
次はエクセルファイルを読み取りしてみる
今度は事前にテンプレートファイルを用意しておいて、POIで編集してからダウンロードしてみます。
新たにテンプレートファイルを準備するのは面倒なので、さきほどダウンロードされたファイルをそのまま利用することにしました。
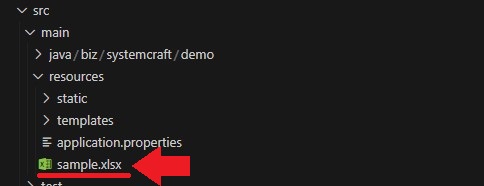
ダウンロードされた「sample.xlsx」を src/main/resource の直下に移動させてください。
再び IndexController を編集します。
downloadExcelメソッドを下記のように変更しました。
package biz.systemcraft.demo.controllers;

import java.io.IOException;
import java.io.InputStream;
import java.time.LocalDateTime;
import java.time.format.DateTimeFormatter;

import org.apache.poi.ss.usermodel.*;
import org.apache.poi.ss.util.CellRangeAddress;
import org.apache.poi.xssf.usermodel.*;
import org.springframework.core.io.ClassPathResource;
import org.springframework.stereotype.Controller;
import org.springframework.web.bind.annotation.RequestMapping;
import org.springframework.web.servlet.ModelAndView;

import jakarta.servlet.ServletOutputStream;
import jakarta.servlet.http.HttpServletResponse;

@Controller
public class IndexController {
    @RequestMapping({ "/", "/index" })
    public ModelAndView get(ModelAndView mav) {
        mav.setViewName("index");
        return mav;
    }

    @RequestMapping({ "/download-excel" })
    public void downloadExcel(ModelAndView mav, HttpServletResponse response) throws IOException {
        //HTTPヘッダに、ダウンロードファイル名を設定
        response.addHeader("Content-Disposition", "attachment; filename=\"sample.xlsx\"");

        // ************** 変更(ここから) ***************
        // テンプレートファイルを開く
        try (InputStream is = new ClassPathResource("sample.xlsx").getInputStream();
            ServletOutputStream stream = response.getOutputStream()) {
            // テンプレートファイルからxlsx形式ブックの生成
            Workbook wb = new XSSFWorkbook(is);
            // シートの取得
            Sheet sh = wb.getSheetAt(0);
            // 行・セル(A1)の取得
            Row row1 = sh.getRow(0);
            Cell cell1 = row1.getCell(0);
            // セルの値を取得
            String value1 = cell1.getStringCellValue();
            // 行・セル(A2)の生成
            Row row2 = sh.createRow(1);
            Cell cell2 = row2.createCell(0);

            try {
                // A1の値をA2へコピー
                cell2.setCellValue(value1);
                // 現在時刻を取得
                String now = LocalDateTime.now()
                    .format(DateTimeFormatter.ofPattern("yyyy-MM-dd HH:mm:ss.SSS"));
                // A1の値を書き換え
                cell1.setCellValue("出力時間:" + now); // 値のセット
                // セル結合
                CellRangeAddress cellRange = new CellRangeAddress(1, 3, 0, 6);
                sh.addMergedRegion(cellRange);
                // 文字色変更
                CellStyle style = wb.createCellStyle();
                Font font = wb.createFont();
                font.setColor(IndexedColors.WHITE.getIndex());
                font.setBold(true);
                font.setFontHeightInPoints((short)22);
                style.setFont(font);
                style.setVerticalAlignment(VerticalAlignment.CENTER);
                // 背景色変更
                style.setFillPattern(FillPatternType.SOLID_FOREGROUND);
                style.setFillForegroundColor(IndexedColors.AQUA.getIndex());
                cell2.setCellStyle(style);
                wb.write(stream);
            } finally {
                try {
                    wb.close();
                } catch (Exception ex) {
                }
            }
        }
        // ************** 変更(ここまで) ***************
    }
}「src/main/resource/sample.xlsx」にアクセスするには、まずnew ClassPathResource("sample.xlsx").getInputStream()でInputStreamを取り出します。
このInputStreamを引数に指定してXSSFWorkbookをnewすれば既存のエクセルファイルを開いた状態になるわけです。
あとは、このエクセルファイルをあれこれいじくって、最後にResponseStreamに書き込めばOK。
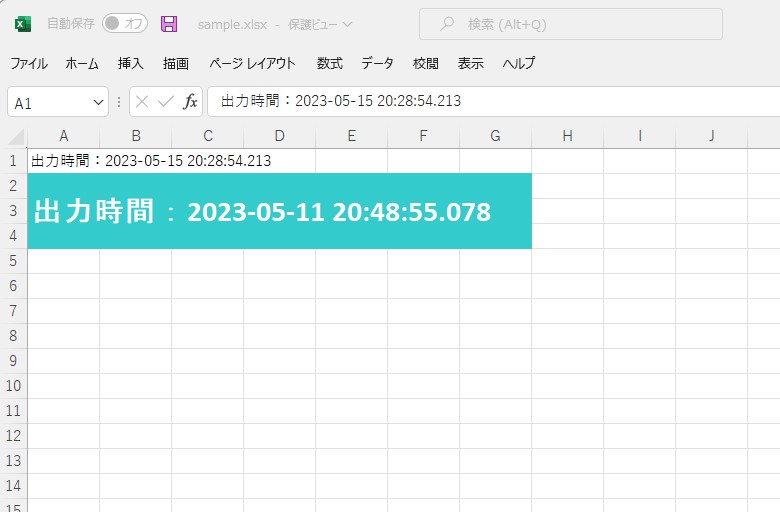
ちなみに、セル結合、フォント変更、セルスタイル変更なども一緒に試してみました。
結果はこんな感じです。
ここまでやっても、そこまで難しい感じはしませんね。
扱いやすいライブラリ、といった印象。
ただ、VBAなんかで実装してもそうですが、エクセル操作はコードが冗長になりがちなのが、悩ましいところで、POIでもそのあたりは同じになりそうな雰囲気です。
クセつよポイントとは?
紹介してくれた人の話ではなかなかクセのあるライブラリらしいのですが、どのあたりを指してそう言っているのかはよくわかりませんでした。
ということで「クセつよポイント」を少し検索してみました。
この記事がよくまとまっています。
あと個人的に気になったのはこちらです。
SXSSFWorkbookを利用する際の個人的な注意点 (行単位のアクセス単位は避けたほうが無難 / 既存のxlsxファイルで書き込み済みの行にはアクセスできない) – Qiita Backup
調べてみるといろいろとあるみたいですね。
実際に仕事として何本か作ってみましたが、あまりややこしいことをしなければ、割とすんなり実装できました。
正直、それほど難しいという印象は無かったですね。
強いて言うなら画像を貼り付けるのに少し手こずったくらいですかね。
ということで最後にエクセルに画像を貼り付けるコードを紹介しておきます。
package biz.systemcraft.demo.controllers;

import java.io.IOException;
import java.io.InputStream;
import java.time.LocalDateTime;
import java.time.format.DateTimeFormatter;

import org.apache.poi.ss.usermodel.*;
import org.apache.poi.ss.util.CellRangeAddress;
import org.apache.poi.xssf.usermodel.*;
import org.springframework.core.io.ClassPathResource;
import org.springframework.stereotype.Controller;
import org.springframework.web.bind.annotation.RequestMapping;
import org.springframework.web.servlet.ModelAndView;

import jakarta.servlet.ServletOutputStream;
import jakarta.servlet.http.HttpServletResponse;

@Controller
public class IndexController {
    @RequestMapping({ "/", "/index" })
    public ModelAndView get(ModelAndView mav) {
        mav.setViewName("index");
        return mav;
    }

    @RequestMapping({ "/download-excel" })
    public void downloadExcel(ModelAndView mav, HttpServletResponse response) throws IOException {
        //HTTPヘッダに、ダウンロードファイル名を設定
        response.addHeader("Content-Disposition", "attachment; filename=\"sample.xlsx\"");
        // テンプレートファイルを開く
        try (InputStream is = new ClassPathResource("sample.xlsx").getInputStream();
            ServletOutputStream stream = response.getOutputStream()) {
            // テンプレートファイルからxlsx形式ブックの生成
            Workbook wb = new XSSFWorkbook(is);
            // シートの取得
            Sheet sh = wb.getSheetAt(0);
            // 行・セル(A1)の取得
            Row row1 = sh.getRow(0);
            Cell cell1 = row1.getCell(0);
            // セルの値を取得
            String value1 = cell1.getStringCellValue();
            // 行・セル(A2)の生成
            Row row2 = sh.createRow(1);
            Cell cell2 = row2.createCell(0);

            try {
                // A1の値をA2へコピー
                cell2.setCellValue(value1);
                // 現在時刻を取得
                String now = LocalDateTime.now()
                    .format(DateTimeFormatter.ofPattern("yyyy-MM-dd HH:mm:ss.SSS"));
                // A1の値を書き換え
                cell1.setCellValue("出力時間:" + now); // 値のセット
                // セル結合
                CellRangeAddress cellRange = new CellRangeAddress(1, 3, 0, 6);
                sh.addMergedRegion(cellRange);
                // 文字色変更
                CellStyle style = wb.createCellStyle();
                Font font = wb.createFont();
                font.setColor(IndexedColors.WHITE.getIndex());
                font.setBold(true);
                font.setFontHeightInPoints((short)22);
                style.setFont(font);
                style.setVerticalAlignment(VerticalAlignment.CENTER);
                // 背景色変更
                style.setFillPattern(FillPatternType.SOLID_FOREGROUND);
                style.setFillForegroundColor(IndexedColors.AQUA.getIndex());
                cell2.setCellStyle(style);

                // *********** (画像出力:ここから) ********************
                // 画像を読みこみ
                try (InputStream imageStream = new ClassPathResource("image01.jpg").getInputStream()) {
                    byte[] imageBytes = org.apache.poi.util.IOUtils.toByteArray(imageStream);
                    int pictureIdx = wb.addPicture(imageBytes, Workbook.PICTURE_TYPE_JPEG);

                    // ドローイングキャンバスを作成
                    Drawing<?> drawing = sh.createDrawingPatriarch();
                    CreationHelper helper = wb.getCreationHelper();
                    ClientAnchor anchor = helper.createClientAnchor();

                    // 画像を表示するセルの位置を設定
                    anchor.setCol1(2);
                    anchor.setRow1(5);

                    // ドローイングキャンバスに画像を追加
                    Picture picture = drawing.createPicture(anchor, pictureIdx);
                    picture.resize(0.5); // 画像サイズを自動調整

                    imageStream.close();
                }
                // *********** (画像出力:ここまで) ********************

                wb.write(stream);
            } finally {
                try {
                    wb.close();
                } catch (Exception ex) {
                }
            }
        }
    }
}
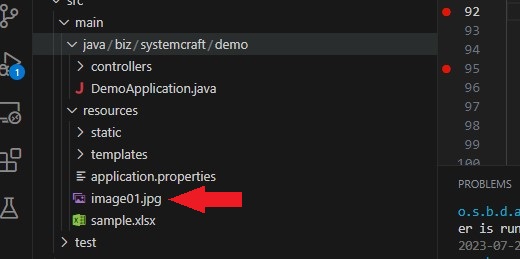
sample.xlsx のすぐ隣に image01.jpg というファイル名で画像ファイルを保存しておきます。
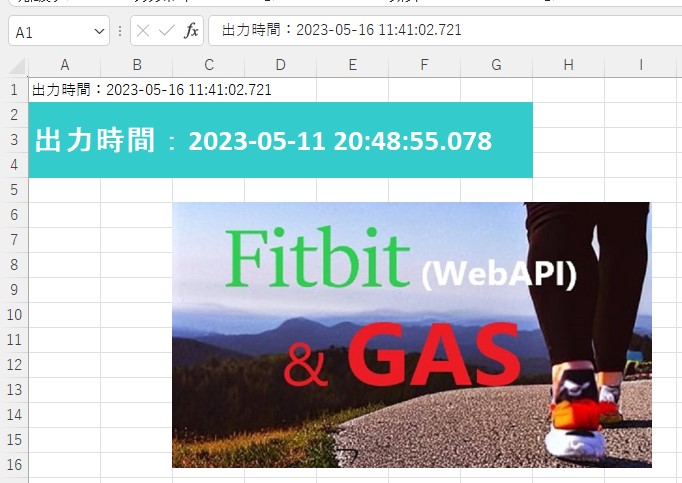
出力されたファイルはこんな感じになりました。
88行目の
picture.resize(0.5);
というコードで画像を 1/2 のサイズに縮小してます。
拡大/縮小が必要なければ、”0.5″という引数を省略するか”1″を指定します。
このpicture.resize()というメソッドはなかなか奥が深そうです。
機会があればちょっと本格的に調査して仕様をまとめてみたいなと思います。
ちなみに、セル幅と高さをピクセル単位で正確に取得するのは難しそうなので、例えば「A5:B12の範囲で貼り付ける」ようなことはちょっと難しそうです。
(私はこれをやろうとして手こずってしまいました。)
まとめ
ということで、今回はApache POIを触ってみました。
Javaでエクセルをいじれると、色々と業務の効率化に役立ちそうじゃないですか?
何かアイディアを思いついたら、ぜひ試してみて下さい。
もしかすると、システムクラフトがお手伝いできることもあるかもしれません。
よろしければ、ぜひぜひご相談下さい。
お待ちしています!!





コメント